Getting started with chords can be a confusing and frustrating process. If you search the internet for how to play guitar you will get several different opinions on where to start, how to start, what chords to start with, the right way to strum, and on and on and on until we are paralyzed and just give up.
My goal is to change your mindset and simplify the process of learning chords. First of all THERE IS NO RIGHT WAY. THERE ISN’T ONE WAY, the only way that matters is your way to learning guitar.
That being said, don’t worry about finding the perfect technique, just try things and grab on to the ones that work. These 5 tips may not be for you and they are definitely not the only way, but these are ideas and techniques that have worked for me and my students, so take what is useful to you and leave the rest behind.
Tip 1- Get Ahead by Picking Easier Keys
There are certain chords that most people find easier than others and some keys have more of these chords than others.
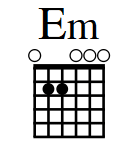
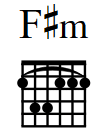
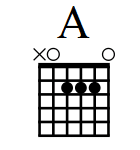
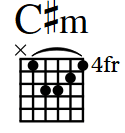
You can have an easier start to chords by picking songs that you like in a key that has more chords that are easier to play. These keys include D Major, G Major, and A Major.
Chords in D Major

1

2

3

4

5

6
Notice the numbers below the chords above. Chords are basically used the same way in each key and the relationship of the chords to each other, is described by these numbers below the chords above. Most songs, no matter the key, will use the first chord, the fourth chord, and the fifth chord most frequently and the other 4 chords within the key may be sprinkled in occasionally.
If the song you choose has one of the minor chords and you feel intimidated, don’t worry, in tip 4 I will help you simplify the harder chords.
Chords in G Major

1

2

3

4

5

6
Chords in A Major

1

2

3

4

5

6
Tip #2- Separate the way you practice chords
Chords really involve several things happening all at once. On the piano chords aren’t introduced until later, but on guitar it’s one of the first things most people try to tackle.
The first thing that we need to pay attention to is the placement of our fingers and not only make sure that our fingers are on the correct fret and string, but also that they aren’t interfering with other strings or fingers. For most people stretching our fingers out to get to these different chords feels unnatural and can take a little time for us to make clear chords.
When we practice, we should take some time to make sure that the chords we are about to play are clear and that every string is sounding and no finger is getting in the way of the vibration of the string it is on or any other string. The best way to do this is to get your fingers in the chord position on play each string individually. Do this for every chord in the song that you are playing until you get clear or fairly clear notes.
The next part of chords is what we do with our strumming hand. I’ll get to some tips on that in tip three, but for the purposes of this tip it is important that we keep chord clarity and strumming rhythms as separate parts of our practice routine.
What does this look like? After you practice the chord positions and check that each string is sounding properly and you move to playing through the song you are playing, don’t stop to fix any unclear notes. Strumming is a separate technique and should be treated as such. If you stop to fix unclear notes, you will end up hindering your progress on strumming.
Once you move into playing through the song you are working on, don’t stop to fix finger placement!
Tip #3- Rhythm is Key
When you strum, start out by keeping it simple. Don’t get caught up in worrying about whether you should be doing a down stroke or an upstroke. Start out just keeping the beat with downstrokes and later move to eighth notes with a down and up motion. You can do almost any rhythm of any song by only maintaining the up and down motion not changing them up.
The other important part of strumming is to stay on beat. It is fine if you need time to move from chord to chord, but do it in a rhythmic way.
For example play a chord for 4 beats then keep a steady count of 4 beats and try to play the next chord after you count to 4. If this is easy, then play for 4 beats and give yourself 3 beats to change. Keep dropping a beat each time until you get to where you don’t have to have any break in between.
Tip #4- Simplify Chords that are difficult for you
Many of the chords up above on tip one have repeated notes and you don’t have to play them all to get the main sound of the chord. One way to slowly work into these more difficult chords is to only play the bottom portion of the chord. If this is still too hard for the moment, only do the root note of the chord until you build up finger strength.
Watch the video above for exactly how to break chords into smaller more manageable chords.
Tip #5- Have Fun and Enjoy the Process!
Chords can be frustrating, but find songs that you like that you can play along to. Use tips 1-4 to find your path to getting better at chords and find the parts of playing guitar you enjoy the most and do that more often.
There is no one way to play guitar, find your way!

